In order to create a virtual machine Start the
vSphere Client by opening Start > All Programs > VMware > VMware
Sphere Client. This will open up the vSphere Client login page, shown in the
figure below. On this page, provide the IP address for your ESXi host and also provide the root user name and
password that you specified during the setup of your server

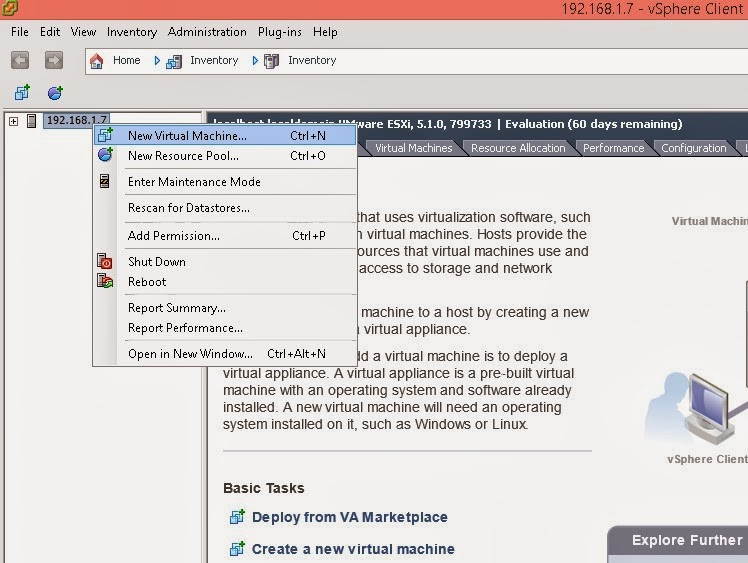
Once you’ve granted access to the vSphere
Client it will look like this in the figure given below

Now right click your server IP address and
choose New Virtual Machine or there is another option under basic task “Create
a virtual machine”.
The first step do you want to use Custom settings for your new
virtual machine or do you want to use settings that typically work well based
on the operating system you use? I’m choosing the Custom option as it will
elaborate more options inside.

The second step it will ask you to provide the
name of the virtual machine.

The fourth step is choosing the version of a
virtual machine.
What is the version of virtual machine?
VMware has introduced a new version of their
virtual machine format – version 8. In addition to enabling a number of new
maximums, version 8 also brings with it 3D graphics capability to allow support
for Windows Aero and support for high speed USB 3.0 devices. These new hardware
capabilities will extend the potential use cases for vSphere, particularly with
regard to desktop scenarios. The table below gives you a look at some of the
more significant differences between version 7 and version 8 virtual machines.
Although version 8 VMs are much more scalable than their version 7
counterparts, version 8 hardware is not supported across all of VMware’s and
third party products yet, so choose carefully and only after checking with your
vendors.
Some capabilities are dependent on the VMware
edition as well. For example, 32-way SMP is available with Enterprise Plus. The
table below outlines the high level differences between version 7 and 8 virtual
machines without taking into regard edition.
Version 7
|
Version 8
|
|
SMP
|
8-way
|
32-way
|
RAM
|
256 GB
|
1 TB
|
3D support
|
No
|
Yes
|
BIOS
|
Yes
|
Yes
|
EFI
|
No
|
Yes
|
CPU hot add
|
Yes
|
Yes
|
RAM hot add
|
Yes
|
Yes
|

The next step is to identify the operating
system that will run inside the virtual machine. Your selection will help the
client identify the baseline specifications that will be recommended for this
new virtual machine. Over here I am
selecting windows 2008 R2 64 bit edition. Please note: If you select
wrong operating system the virtual machine will not run as in the virtual
Machine hardware compatibility issues will occur.

When you will click next you’ll begin to see
where ESXi 5 has introduced some changes. Rather than simply assigning a number
of cores to a virtual machine, specify the number of virtual sockets you’d like
to assign to the machine as well as the number of cores per socket you’d like
to assign. The client will calculate the number of cores based on the values
you specify.

In the Next step, you will assign RAM to the
virtual machine. The virtual machine creation wizard provides you with a number
of different recommendations including the minimum recommended RAM based on the
operating system you selected, default recommended RAM for this OS and the
maximum recommended RAM for this particular operating system.

In the next step we will assign the nic card
known as Network Adaptor.
Every virtual machine needs one or more network
adapters. On the next screen of the wizard, choose the number of NICs you’d
like to add to the virtual machine, choose the virtual network to which each
NIC should be attached and choose your NIC type.
·
E1000. The E1000 is an emulated version of the
Intel 82545EM Gigabit Ethernet adapter. Not all guest operating systems include
support for this adapter. Generally, if you’re running a system with Linux
kernel 2.4.19 or later, Windows XP Professional x64 Edition and later, and
Windows Server 2003 (32-bit) and later, you’ll find E1000 support.
·
VMXNET 2 (Enhanced). Unlike the E1000, the
VMXNET adapters do not have physical counterparts and are specifically designed
for use in a virtual machine. Once you install VMware Tools, drivers for this
network adapter are provided. VMXNET 2 builds on the base VMXNET by adding
support for features such as jumbo frames and hardware offload. VMXNET 2
support is provided in the following operating systems:
o Windows Server 2003
o Windows Small Business Server 2003
o Windows XP Pro 32-bit
o Red Hat Enterprise Linux 5.0
o SUSE Linux Enterprise 10
o Red Hat Enterprise Linux 4.0 64-bit
o Ubuntu Linux 64-bit
o Windows Server 2003
o Windows Small Business Server 2003
o Windows XP Pro 32-bit
o Red Hat Enterprise Linux 5.0
o SUSE Linux Enterprise 10
o Red Hat Enterprise Linux 4.0 64-bit
o Ubuntu Linux 64-bit
·
VMXNET 3. VMXNET 3 is not simply a next version
of VMXNET 2. It’s a new adapter type that includes all of the features of both
VMXNET and VMXNET 2 but adds additional features including IPv6 offloads and
multiqueue support. VMXNET 3 is supported in the following guest operating
systems (refer to VMware documentation for limitations that may be specific to
each operation system):
o Microsoft Windows XP,7, 2003, 2003 R2, 2008, and 2008 R2
o Red Hat Enterprise Linux 5.0 and later
o SUSE Linux Enterprise Server 10 and later
o Asianux 3 and later
o Debian 4
o Ubuntu 7.04 and later
o Sun Solaris 10 U4 and later
o Microsoft Windows XP,7, 2003, 2003 R2, 2008, and 2008 R2
o Red Hat Enterprise Linux 5.0 and later
o SUSE Linux Enterprise Server 10 and later
o Asianux 3 and later
o Debian 4
o Ubuntu 7.04 and later
o Sun Solaris 10 U4 and later
·
Whenever Possible use VMXNET3

In next step you need to choose which vSCSI
controller do you need ?
Although the network adapter type is an
important selection for your new virtual machine, your choice of SCSI
controller will likely have more significant performance implications. This
selection is made on the next screen of the virtual machine creation wizard.
·
1. BusLogic Parallel. This is the default
selection for older operating systems.
·
2. LSI Logic Parallel. This is akin to a
traditional parallel SCSI adapter and is not suitable for all purposes, but is
generally compatible with guest operating systems.
·
3. LSI Logic SAS. This is the default for
Windows-based guest operating systems.
·
VMware Paravirtual. As is the case with the
VMXNET series of Ethernet adapters, the VMware Paravirtual SCSI (PVSCSI)
adapter is designed for virtual hardware, but it has some limitations, such as
a restricted list of supported guest operating systems.

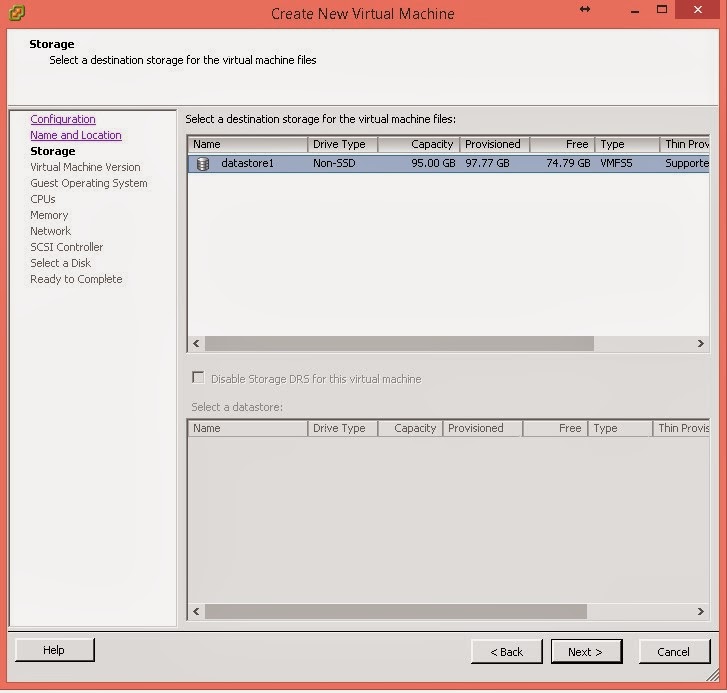
Now in the next step, choose your virtual disk.
You can create a brand new virtual disk, as you can see in Figure given
below, use an existing disk, create a raw device mapping (RDM) or not create a
disk at all.

The next step will be Select a disk.
.On this screen, there are three questions:
·
Size of the new virtual disk
·
Provisioning type
o Thick Provision Lazy Zeroed. Fully allocated space for the new virtual disk and wipes it of previous data.
o Thick Provision Eager Zeroed. Fully allocates, wipes, and zeroes out allocated space on the new virtual disk. Some applications require the use of Eager Zeroed disks. On the surface, it would seem that this type of disk provides the best performance since space is already allocated and prepared, but some testing has shown that the performance benefits may not be substantial.
o Thin Provision. Disk space is not immediately allocated to the disk. It’s allocated on demand with the upper space limit being the specified size of the virtual disk. There are enormous space benefits to be had with thin provisioning, but it also requires you to keep a careful eye on storage to avoid accidentally over provisioning and running out of space.
·
Virtual disk location

Last step if you like , you can make advanced
changes to the disk configuration on the next page of the wizard.

Virtual machine is ready to complete. Click Next
This is the review of summary screen ,click finish to create a virtual machine.

No comments:
Post a Comment